
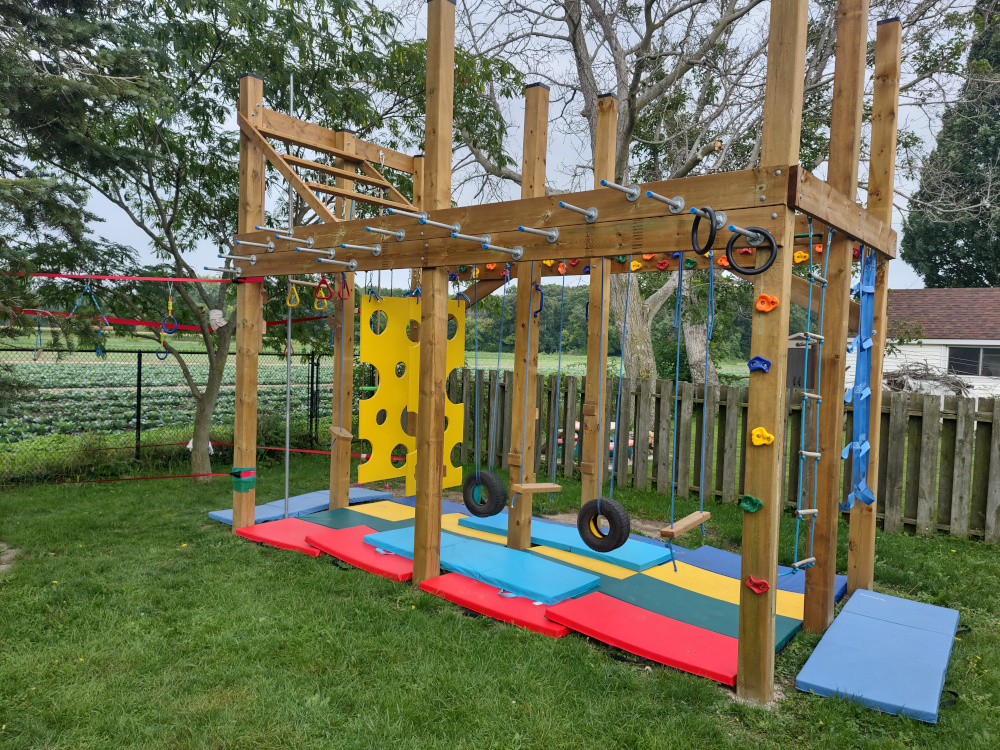
How to Build a Backyard Ninja Course for Adults
A backyard ninja course is a brilliant way to bring obstacle training, strength work and a bit of friendly competition into your own outdoor space. Designed well, it can challenge experienced athletes while still offering easier options for beginners. The key is to build a course that suits your garden, your goals and your level of experience—and to put safety first.
Start with your space and your goals
Before buying equipment, measure the area you have available and think about how you want to use it. A compact course might feature a grip station, balance obstacles and a low climbing frame. A larger garden could accommodate a sequence of obstacles with space for a run-up and a clear landing area.
Decide whether your course is mainly for strength training, agility, general fitness or social challenges. This will help you choose obstacles that are enjoyable and useful, rather than filling the garden with equipment you rarely use.
Choose obstacles that offer different challenges
A good adult course tests more than upper-body strength. Combining grip, balance, coordination and movement makes training varied and helps prevent the course from becoming repetitive. Consider including:
- Monkey bars or overhead rungs: A classic grip and shoulder challenge. Choose a model designed for adult use and check its stated weight limit.
- Rings or hanging grips: These can be adjusted to create different routes and levels of difficulty.
- A balance beam: A low beam is a simple way to practise control and foot placement.
- A climbing net or wall: Climbing obstacles add variety and can be adjusted to suit the available space.
- Stepping pods or tyres: These encourage quick, accurate movement. Make sure they cannot roll or shift underfoot.
- A cargo net or rope obstacle: These add a challenge, but need secure anchoring and regular inspection.
It is better to install a few well-built obstacles than to cram in too many. Leave enough room between them to move safely and to dismount without colliding with another structure.
Plan a route with options
Arrange obstacles so that the course flows naturally. For example, a route might move from a balance challenge to a climbing obstacle, then to a hanging section and a final sprint. Keep transitions clear, and avoid placing a difficult obstacle immediately after a landing area.
Make the course adaptable. Rings can be set at different heights, while stepping obstacles can be spaced more closely together for an easier route. You could also create a beginner route and a more challenging alternative. This makes the course more welcoming and lets you progress over time.
Make safety part of the design
Adult training equipment can place considerable force on its supports, particularly during swinging or dynamic movements. Use equipment intended for the activity, follow the manufacturer’s installation instructions and check the maximum user weight. If a structure needs anchoring, use the specified fixings and have the installation assessed by a suitably qualified professional if you are unsure.
Prepare the ground beneath and around the obstacles. Grass may be suitable for low-impact activities, but it can become slippery or uneven. Depending on the height and type of obstacle, consider an appropriate impact-absorbing surface. Keep the landing zone clear of paving edges, garden furniture, walls and sharp objects.
Inspect the course regularly. Look for loose bolts, worn ropes, cracked timber, corrosion and unstable foundations. Stop using any obstacle that appears damaged until it has been repaired or replaced. Check conditions before each session, especially after strong winds or heavy rain.
Choose durable, weather-ready materials
Outdoor equipment needs to cope with changing weather. Look for materials and finishes intended for external use, and protect timber and metal as recommended by the manufacturer. Ropes, straps and grips can wear over time, so keep an eye on areas exposed to friction, sunlight and moisture.
In the UK, rain can make wooden beams, bars and platforms slippery. Allow surfaces to dry before training, and avoid using the course during icy conditions or high winds. A cover may help protect some equipment, but it does not replace regular maintenance.
Build up gradually
A challenging course can be tempting to tackle at full speed, but good technique matters more than rushing. Warm up with light movement and mobility work, then practise each obstacle at a controlled pace. Begin with easier variations and increase the difficulty as your grip, coordination and confidence improve.
Allow time for recovery, particularly after demanding grip or shoulder work. If you feel pain, dizziness or unusual discomfort, stop the session. Anyone returning to exercise or managing an injury should consider speaking to a health professional before starting a demanding training routine.
Make it a space you will use
Your course does not need to look like a television obstacle challenge to be effective. A thoughtfully arranged set of obstacles can provide a fun workout and a reason to spend more time outdoors. Add a storage solution for removable equipment, keep the route tidy and make sure there is space to warm up and cool down.
With careful planning, sturdy equipment and sensible progression, a backyard ninja course can become a versatile training space for adults of different abilities. Start with the essentials, build safely and adapt the challenges as your skills develop.
Essential Tips for Creating a Safe and Challenging Backyard Ninja Course for Adults
- Check obstacles are firmly anchored before each session.
- Use shock-absorbing mats beneath high or swinging obstacles.
- Leave plenty of clearance from fences, trees and walls.
- Start with easier obstacles and build up gradually.
- Warm up your shoulders, wrists and legs before training.
- Keep hands dry and grips clean for better control.
- Train within your ability and stop when you feel pain.
- Inspect ropes, holds and fixings regularly for wear.
Check obstacles are firmly anchored before each session.
Before each session, check that every obstacle is firmly anchored and stable. Give posts, frames and fixings a careful visual inspection, and gently test for movement before putting your full weight on them. Loose anchors or worn fittings can cause equipment to shift or collapse, so don’t use an obstacle until it has been properly secured or repaired.
Use shock-absorbing mats beneath high or swinging obstacles.
Place shock-absorbing mats beneath high or swinging obstacles to help soften the impact of an accidental fall. Choose mats designed for outdoor use and suitable for the height and type of obstacle, ensuring they cover the likely landing area and cannot slide or bunch up. Check them regularly for wear, waterlogging or damage, and remember that mats reduce risk but cannot prevent every injury.
Leave plenty of clearance from fences, trees and walls.
Leave plenty of clearance between obstacles and nearby fences, trees and walls so you have room to swing, climb and dismount without striking anything. Check the whole movement path—not just where you start—and keep landing areas clear of branches, posts and other hard objects. If your garden is tight on space, choose low-profile obstacles and arrange them to allow safe movement rather than squeezing in one more challenge.
Start with easier obstacles and build up gradually.
Start with easier obstacles to build confidence, practise good technique and see how your body responds. Once you can complete them comfortably, gradually increase the challenge by adjusting the height, distance or difficulty, or by adding a new obstacle. Progressing at a steady pace helps you develop strength and coordination while reducing the risk of injury.
Warm up your shoulders, wrists and legs before training.
Before tackling your backyard ninja course, take a few minutes to warm up your shoulders, wrists and legs. Try gentle arm circles, wrist rotations, leg swings and light squats to prepare your joints and muscles for hanging, gripping, climbing and jumping. Start slowly and increase your movement gradually; a proper warm-up can help you feel more ready to train and reduce the risk of strains.
Keep hands dry and grips clean for better control.
Keep your hands dry and your grips clean to maintain better control on every obstacle. Sweat, rain and dirt can make bars, rings and holds slippery, increasing the chance of losing your grip. Wipe equipment down regularly, check it is dry before you start, and keep a towel nearby during training. If conditions are wet, postpone grip-heavy obstacles until they are safe to use.
Train within your ability and stop when you feel pain.
Train at a level that feels manageable, and build up gradually as your strength, balance and confidence improve. Focus on controlled movements rather than rushing through obstacles, and take breaks when you need them. If you feel pain, stop straight away; do not try to push through it, as this could make an injury worse.
Inspect ropes, holds and fixings regularly for wear.
Inspect ropes, holds and fixings regularly for signs of wear, such as fraying, cracks, rust or loose bolts. Outdoor equipment is exposed to rain, sun and repeated strain, so even small defects can become a safety risk. Check everything before each session, tighten or replace parts as needed, and stop using any obstacle that seems damaged until it has been repaired.